
How to use ITX Flex
-
+
Important information if you are using MacOS!
Please note that you Mac needs to have a supported version of MacOS. See which versions are supported here: endoflife.date/macos
We do NOT recommend using multiple desktops when using ITX Flex on MacOS.
It is important that you follow these instructions and allow ITX Flex to run correctly on your Mac.
-
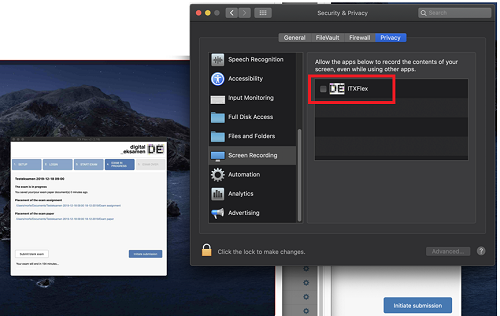
If you haven't allowed screen recording on your Mac before, you will be prompted to change your system preferences. You will not be able to access the exam until you have edited your settings under "Security & Privacy" and allowed ITX Flex to perform screen recording. You cannot just "bypass" these settings and you deny this setting, you will not be able to access the exam.
-
If you have previously allowed screen recording but since removed the setting, you will not be able to access the exam. However, you will NOT automatically be prompted to change your system preferences, which means that you have to find the settings yourself. You will not be bale to access the exam until you have allowed screen recording.
-
"System preferences" and "Security & Privacy" can look different depending on which OS you are running. Generally speaking, open "System Preferences" and go to "Security & Privacy" where you need to mark the box next to ITX Flex to allow the application to perform screen recording.
The interface might look like this:
-
If you are unsure of how to enable the required settings or if you doubt whether ITX Flex is working correctly, please contact IT Support at 9940 2020 or serviceportal.aau.dk. You can also get help at your local helpdesk.
-
-
+
Try the ITX Flex demo
If you have already installed ITX Flex, start at step 3.
- Click on 'Login to ITX Flex' on this page.
- Choose the right installation (Windows or Mac) and follow the installation instructions.
- Open the program.
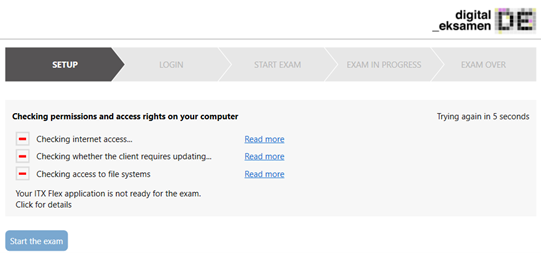
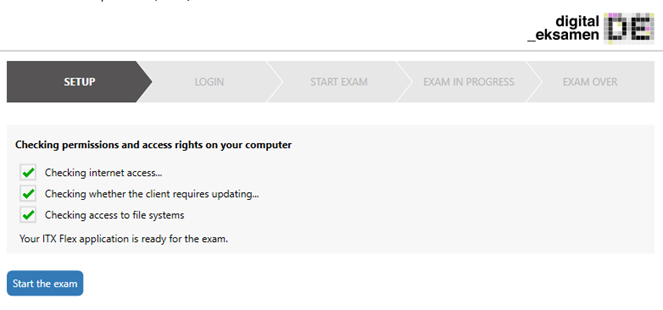
The program will now do a check to see if everything is ready.
If you see three green checkmarks, your PC is ready and you can click [Start exam].
You will now be taken to a login page.
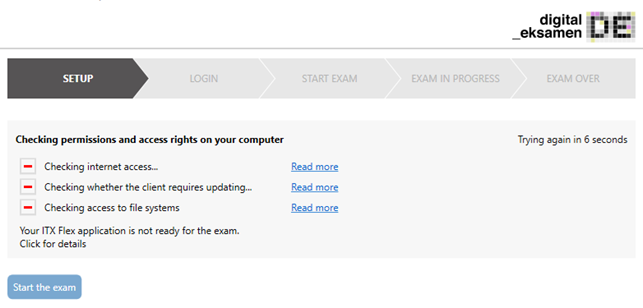
If you see one or more red crosses instead of the green checkmarks, fix the problem. Contact IT support at 9940 2020 or your local service desk if you need help.
- In the step "LOGIN", enter your personal code.
- On a demo exam, enter "H00000" and click "Continue"
- On a real exam, you will find your personal code on the test in Digital Exam

NOTE: for MacOS users, the red frame does not always follow the open window, but ITX Flex records the active window anyway)
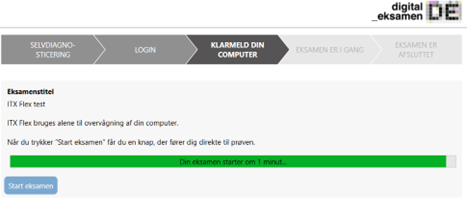
- Now click on [Start the exam].
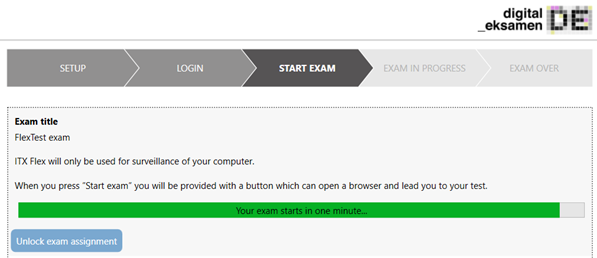
- Once the exam starts (the green bar is full), enter the PIN code in the ITX Flex client.
- On a demo test, the PIN code is "00000"
- For your real exam, you will be given the PIN code by staff in the room.
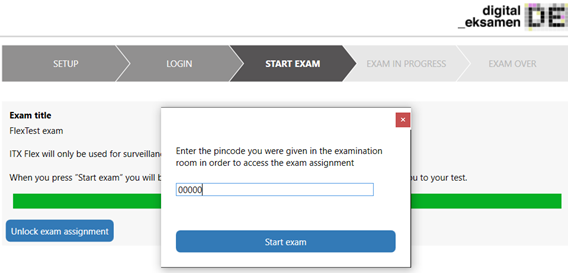
- Click [Start exam]. ITX Flex is now active and monitors your computer.
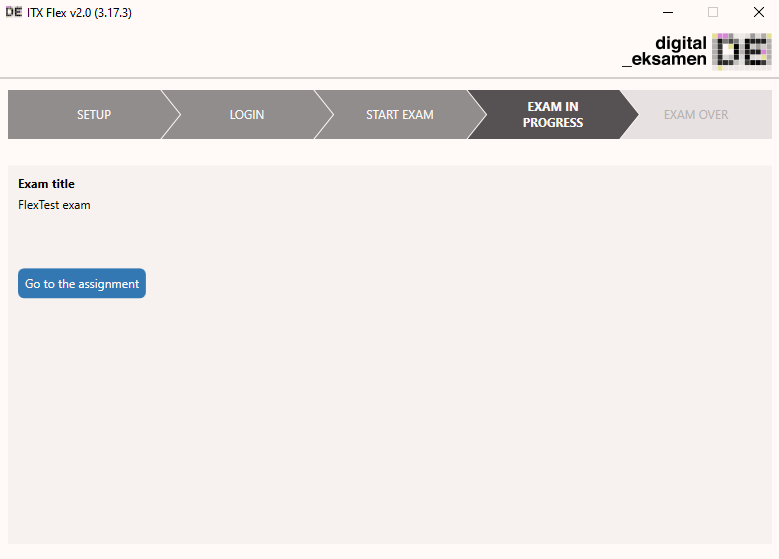
- Now you've reached the step "Exam in progress" - click [Go to the assignment]
Now you receive the final confirmation that you have completed the demo exam:

- When the exam starts, you will find the assignment in Digital Exam, and must also upload and submit your answer in Digital Exam. Once that's done and you can see your "confirmation of exam submission", you can shut down ITX Flex. If you forget, the program closes itself no later than 15 minutes after the exam deadline.
- Click on 'Login to ITX Flex' on this page.
-
+
Before the exam
Remember, it is your responsibility that your computer and ITX Flex is ready on the day of the exam.
We recommend that you install ITX Flex well in advance, preferably several days before your exam, and make sure that the system is ready.
It takes 1 minute and just requires you to start up ITX Flex.
The program does a self-check when it starts, and if you see a series of green checkmarks, you are ready.
If you get a warning that something is wrong or missing, make sure to correct it before your exam.
If you experience problems, you can always get help at a local IT service desk, or call 2020.
You can also take a demo exam before your real exam.
-
+
On the day of the exam
- Arrive well in advance – preferably one hour before your exam begins.
- Before you are seated, you must confirm your attendance by registering with an invigilator. If you do not register with an invigilator before the exam, you cannot hand-in your assignment!
- Before your exam, you must activate the ITX Flex client. If you have already tested the system before your exam, simply open the program ITX Flex.
If you have not installed and tested ITX Flex before the exam, please follow the steps described in the section ‘Before the exam’ or see the official guide to setting up ITX Flex.
- In ITX Flex, click [Start exam] and enter your personal code. The monitoring program now knows that you are the one who is logged in.
- You are now ready to start your exam.
- Arrive well in advance – preferably one hour before your exam begins.
-
+
During the exam
- When the exam begins, you must enter a PIN code to access the exam assignment. The PIN code will be made available by the invigilators in the room.

- Now click "Go to the assignment" and the find the exam assignment on the test in Digital Exam.
- Be aware that it may take some time to read the assignment.
REMEMBER to save your answer often.
- When you have finished your answer, upload it in Digital Exam and then click [Check out and submit exam].

Uploading the answer.
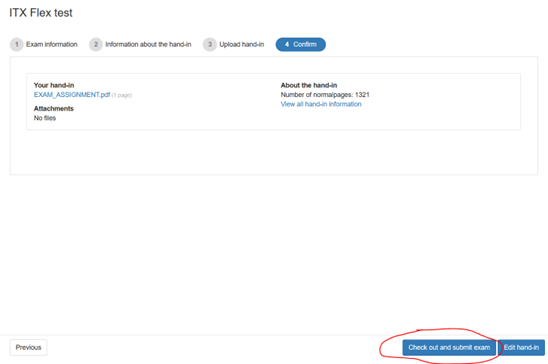
- Please note that you can only return once.
- If you discover an error in your response after submitting it, please contact a staff member to regain access to you answer.
- Please remember that ITX Flex must run until you make your final submission!
-
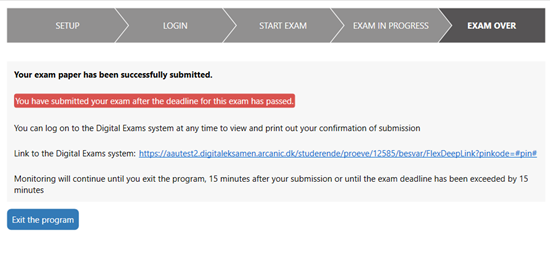
Once you have submitted, you will receive a submission receipt in Digital Exam.
If it says in black writing that "The answer has been received", then everything is as it should be and you are done.

If you have submitted too late, it will say so in red and you must then apply for dispensation. Contact your study secretary. -
After you have submitted your answer in Digital Exam, it takes a short moment for ITX Flex to register your submission. Once OK, You can close the program.
-
If you do not exit ITX Flex, it will stop on its own 15 minutes after the exam deadline.
- When the exam begins, you must enter a PIN code to access the exam assignment. The PIN code will be made available by the invigilators in the room.
-
+
After the exam
- You can always log in to Digital Exam to see your submission receipt.
- By selecting your exam, you can view the data registered during your exam.
- You can always log in to Digital Exam to see your submission receipt.
Login to ITX Flex
Login to Digital Exam
